Application Proxy
Overview
With the Mamori application inline proxies you can apply data privacy controls across your existing web applications, APIs or BI servers - without having to change the end application:
- Operates over standard web protocols HTTP/HTTPS, REST and SOAP
- Configurable masking and hashing of structured data such as JSON, XHTML and XML/SOAP payloads
- Automatic traffic-capture mode for fast provisioning and PII discovery
- Small footprint
When combined with a Mamori server the proxies can:
- Apply user and role based safeguards
- Utilise Mamori reveal, approval and endorsement workflows
Architecture
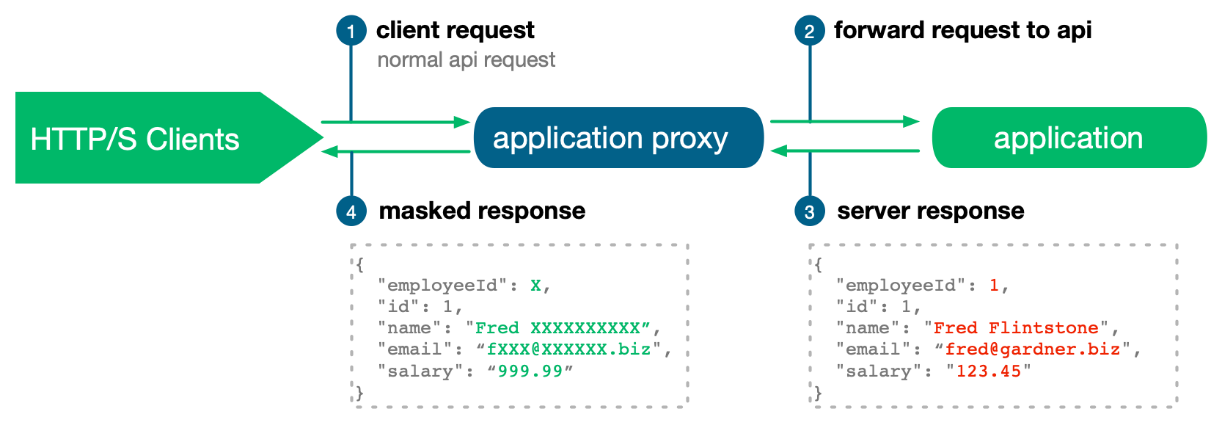
The application proxies run as separate processes from the Mamori server. They are inline, as they are deployed on your network between your clients and the end application/API being proxied. Client requests and API responses pass through the proxy - enabling data privacy controls to be applied in real-time to the data on the wire.
Installation and Deployment
The application and BI proxies are bundled into a single installation distribution that is available from mamori.
The bundle contains:
- The application/API proxy for securing REST/XML API's and applications
- The Qlik proxy for securing Qlik applications.
method: zip
location: on a server near the applications to be secured
download Click here to download
Download distribution
Login to your machine and download the application proxies distribution. Use any user who can sudo.
sudo su -
Unpack distribution
Substitute the release version number in this command:
tar xvfz http-proxy-{version}-install.tar.gz
You should see the following directory structure:
.
└── http-proxy-{version}/
|   ├──README.md                        <-- This README
|   ├──bin/
|   |   ├── encrypt.sh                  <-- Encryption utility for encrypting Mamori server connection credentials
|   |   ├── http_proxy_capture.sh       <-- Script to run a proxy traffic capture
|   |   └── http_proxy_standalone.sh    <-- Script to run the proxy in standalone mode
|   |   └── http_proxy_start.sh         <-- Script to run the proxy as a service (used by systemd)
|   |   └── qlik_proxy_standalone.sh    <-- Script to run the Qlik proxy in standalone mode
|   |   └── qlik_proxy_start.sh         <-- Script to run the Qlik proxy as a service (used by systemd)
|   ├──config/
|   |   ├── logback.xml                 <-- Log configuration
|   |   ├── monitoring.properties       <-- Monitoring configuration for statistics collection
|   |   ├── proxy.properties            <-- Default proxy configuration file
|   |   ├── proxy-{system}.properties   <-- System specific proxy configuration files
|   ├──install/
|   |   ├── install.sh                  <-- Main installation script
|   |   ├── configure_connection.sh     <-- Script to configure and encrypt the Mamori server connection
|   |   ├── install_service.sh          <-- Script to install the proxy as a systemd service
|   |   ├── install_qlik_service.sh     <-- Script to install the Qlik proxy as a systemd service
|   |   └── ...
|   ├──lib/
|       ├── mamoriclient.jar                                        <-- Mamori server jdbc jar
|       └── mamori-http-proxy-{version}-jar-with-dependencies.jar   <-- proxy jar
|   └──log/
|       └── proxy-{system}-<instance>.log           <-- System specific proxy logs
|       └── monitoring-{system}-<instance>.log      <-- System specific monitoring logs (if monitoring is enabled)
Install
cd to the proxy installation directory and run the installation script. This will install the proxy in /opt/mamori/server/http-proxy-{version}:
./http-proxy-{version}/install/install.sh
Your installation is now complete. The proxies should be installed in /opt/mamori/server/http-proxy-{version}. The proxies
are ready to configure and run.
Application/API Proxy - Configuration and Running
For application/API proxying, the proxy can be run in 3 different modes.
1. - Traffic Capture
2. - Standalone
3. - With a Mamori server
The recommended way to start is to run the API proxy in traffic capture mode on your remote system first to capture the API endpoints.
Traffic Capture
Traffic capture will automatically identify an application/API’s endpoints (if unknown), and generate a sample proxy configuration JSON file.
The capture can be run for any number of seconds again an existing REST or SOAP API. While running, exercise the API via the proxy to capture and record the available endpoints/paths.
Once the capture is complete, you can then use the generated JSON file as a basis for your privacy controls and masking configuration. The config can be used in standalone mode or uploaded to the Mamori server to perform discovery or run the proxy with a server.
By default the proxy log level is INFO. If you wish to see the raw requests and responses during traffic capture set the log level to TRACE.
Edit the proxy log configuration file opt/mamori/server/http-proxy-{version}/config/logback.xml and set the log level to TRACE:
<logger name="io.mamori.proxy" level="TRACE"/>
Run the capture script. cd to the proxy installation directory and then to bin. Run the capture from the command line:
./http_proxy_capture.sh -system=<your remote system logical name> -port=<local port> -remoteHost=<remote host> -remotePort=<remote port> -capture=<number of seconds>
- `-system`       A name for your target system
- `-port`         The local port for the proxy to listen on e.g 9443
- `-remoteHost`   The remote API host to forward to (can be localhost)
- `-remotePort`   The remote API port to forward to e.g 443
- `-capture`      The number of seconds to run the capture for
While the capture is running, exercise your target API via the proxy. To exercise the API you can use CURL, a Web browser (if the proxy port is open/accessible) or a client application. Issue API requests directly (PUT/POST/GET etc) to the proxy running locally on the proxy port. The proxy will forward each request through to the application (remote host and port) API and record the API path, generate a default masking filter and then return the API's response to the caller.
The traffic capture will stop once the capture time has elapsed. The generated sample JSON configuration will be placed under /opt/mamori/server/http-proxy-{version}/config/filters.
By default the generated config masks all fields by default using XXX.
Traffic Capture example for jsonplaceholder
jsonplaceholder.typicode.com is a publicly available REST API that exposes several endpoints. In this example you will be running the proxy in traffic capture mode against the jsonplaceholder REST API.
Execute the command to run the capture against jsonplaceholder.typicode.com:443 for 2 minutes:
opt/mamori/server/http_proxy_capture.sh -system="jsonplaceholder" -port=9443 -remoteHost="jsonplaceholder.typicode.com" -remotePort=443 -capture=120
On successful startup you should see the following:
INFO  io.mamori.proxy.http.Proxy - **************************************************************
INFO  io.mamori.proxy.http.Proxy - *** Starting PROXY CAPTURE for system (jsonplaceholder) on port(9443) forwarding to jsonplaceholder.typicode.com:443
INFO  io.mamori.proxy.http.Proxy - *** Capturing traffic for (120) seconds. Set proxy log level to TRACE to see traffic
INFO  io.mamori.proxy.http.Proxy - *** Filter configuration will be exported to capture_jsonplaceholder_*.json once capture is complete
INFO  io.mamori.proxy.http.Proxy - **************************************************************
INFO  io.mamori.proxy.http.Proxy - Capture started....
INFO  io.mamori.proxy.http.Proxy - Capture started....
Simulate an HTTP client by issuing the following CURL commands to the proxy running locally on port 9443:
curl --insecure https://localhost:9443/posts
curl --insecure https://localhost:9443/comments
curl --insecure https://localhost:9443/albums
curl --insecure https://localhost:9443/users
Note, the curl --insecure flag is required to tell curl to accept the proxy's self signed certificate.
Once the capture is finished you should see the following:
INFO  io.mamori.proxy.http.Proxy - Capture finished.
INFO  io.mamori.proxy.http.Proxy - **************************************************************
INFO  io.mamori.proxy.http.Proxy - *** Closing PROXY CAPTURE for system (jsonplaceholder) on port(9443) forwarding to jsonplaceholder.typicode.com:443
INFO  io.mamori.proxy.http.Proxy - *** Exported json to ...capture_jsonplaceholder_<xxxxxx>.json
INFO  io.mamori.proxy.http.Proxy - **************************************************************
Review the generated JSON configuration file. In it you will see masking rules (privacy filters) for each of the jsonplaceholder endpoints -
/posts, /comments, /albums and /users exercised using CURL. This config can be used to mask the API with the proxy running in standalone mode.
Standalone
After traffic capture the next step is to run the proxy in standalone mode. This allows you to quickly test the proxy and to see the impact of your masking rules.
Run the proxy using these command line args:
./http_proxy_standalone.sh -system=<remote system logical name> -port=<local port> -remoteHost=<remote host> -remotePort=<remote port> -json=<json file name>
- `-system`       A name for your target system
- `-port`         The local port for the proxy to listen on e.g 8080
- `-remoteHost`   The remote API host to forward to (can be localhost)
- `-remotePort`   The remote API port to forward to e.g 443
- `-json`         The json configuration file containing your masking rules
The recommended proxy local port is 8080 as port 443 is a privileged port. It is highly recommended that if using SSL that you configure your web server (NGINX or APACHE or HAPROXY) to handle the SSL terminator and forward to the proxy running on your local port e.g 8080 (which will forward traffic to your application API)
Using CURL, a Web browser or a client application issue HTTP requests directly (PUT/POST/GET etc) to the proxy running locally.
The proxy will forward each request through to the remote API and return a masked response according to the rules defined in your JSON configuration file.
Enter a <CTRL-C> to stop the proxy.
When you have finished testing your configuration you can either deploy the proxy as a standalone service or upload your configuration to the mamori server and continue to test with the server.
Standalone example for jsonplaceholder
jsonplaceholder.typicode.com is a publicly available REST API that exposes several endpoints. In this example you will be running the proxy against the jsonplaceholder API using the config file generated in the example traffic capture.
Start the proxy. Specify the JSON configuration file generated by the previous capture example on the command line usin.
opt/mamori/server/http-proxy-{version}/http_proxy_standalone.sh -system="jsonplaceholder" -port=9443 -remoteHost="jsonplaceholder.typicode.com" -remotePort=443 -json="../config/filters/jsonplaceholder-XXX.json" <-- file generated by capture
On successful startup you should see the following:
[main] INFO  io.mamori.proxy.http.Proxy - **************************************************************
[main] INFO  io.mamori.proxy.http.Proxy - *** Starting PROXY for system (jsonplaceholder) on port(9443) forwarding to jsonplaceholder.typicode.com:443
[main] INFO  io.mamori.proxy.http.Proxy - **************************************************************
...
Simulate an HTTP client by issuing the following CURL commands to the proxy running locally on port 9443:
curl --insecure https://localhost:9443/posts
curl --insecure https://localhost:9443/comments
curl --insecure https://localhost:9443/albums
curl --insecure https://localhost:9443/users
Note, the curl --insecure flag is required to tell curl to accept the proxy's self signed certificate.
Enter <CTRL-C> to stop the proxy.
Qlik Proxy - Configuration and Running
The Qlik proxy is able to apply privacy controls to tables within Qlik sheets (dashboards).
Before running the Qlik proxy check that the external facing IP is configured to route to the proxy host in the proxy-{system}.properties config file.
e.g
# set external facing ip for the proxy...note this could be your Load Balancer or the proxy machine
# change this!
# dont use localhost
redirect.to=<proxy host name>[:<local port>] <-- e.g qlik.<yourdomain>.com (include the port if the proxy is exposed directly on a custom port not behind an LB or webserver)
Run the QLIK proxy using these command line args:
./qlik_proxy_standalone.sh -system=<remote system logical name> -port=<local port> -remoteHost=<remote host> -remotePort=<remote port> -clientssl=<true|false> -serverssl=<true|false> -json=<json file name>
-systemA name for your target system-portThe local port for the proxy to listen on e.g 8080-remoteHostThe remote Qlik host to forward to-remotePortThe remote Qlik port to forward to e.g 443-clientssltrue of false - whether the proxy is using SSL for client connections (set to false if running behind NGINX or apache or HAproxy)-serverssltrue of false - whether the proxy is using SSL for the Qlik server connection-jsonThe json configuration file containing your masking rules
The recommended proxy local port is 8080 as port 443 is a privileged port. It is highly recommended that if using SSL that you configure your web server (NGINX or APACHE or HAPROXY) to handle the SSL terminator and forward to the proxy running on the local port e.g 8080. See the section under For adminstrators
If a web server (NGINX or APACHE) is handling the SSL terminator pass in the <clientssl> as false to the service installation script.
Running with a mamori server
In this mode the proxies source the privacy rule configuration from a mamori server.
To configure a proxy to work with a mamori server you must perform the following steps:
Step 1 - Create a dedicated proxy mamori user
Step 2 - Configure the mamori server connection parameters
Step 3 - Configure the user identity extraction mechanism
Step 4 - Create or load the masking configuration into the mamori server
Step 1 - Create a mamori server proxy user
To run with a mamori server, the server connection details i.e the user and password connection properties, must be configured in
the proxy-{system}.properties configuration file.
In mamori, setup a dedicated user for the proxy. e.g httpproxy, assign it admin privileges and keep the credentials for the next step.
Step 2 - Configure the mamori server connection parameters
The mamori server connection parameters are configured in the proxy configuration file ..config/proxy-{system}.properties. It is good practice to maintain
a separate properties file per system being proxied. This is so that the configuration for one system does not interfere with another.
The service will first look for the base proxy configuration file ../config/proxy-{system}.properties. If this does not exist the service will fallback to use config/proxy.properties.
Run the utility to configure and encrypt the mamori server credentials in the properties file:
opt/mamori/server/http-proxy-{version}/install/configure_connection.sh {system} <mamori server host> <mamori server user> <mamori server password>
For example:
opt/mamori/server/http-proxy-{version}/install/configure_connection.sh jsonplaceholder ha.mamori.io httpproxy <password>
This will create and configure a new proxy configuration file ../config/proxy-{system}.properties.
Step 3 - Configure the user extraction mechanism
In order to support user and role based masking the proxy needs to be able to determine the user from a client HTTP request on the wire.
This is typically present on a request header such as Authorization or X-Authorization
See For Adminstrators for more information on configuring user extraction.
Step 4 - Create or load the system masking configuration
In mamori navigate to Policies->Application Policies. In this screen you will see an import option at the top:
You can either import your rule configuration JSON from a file or create the rules manually via the UI.
Import options:
- A mamori JSON configuration file (such as one generated by a traffic capture).
- A SOAP WSDL - this will create the API filter endpoints based on the WSDL operations.
- A SWAGGER file - this will create the API filter endpoints based on the SWAGGER paths.
By default, all masking rules are imported as disabled and must be explicitly enabled via the UI to be visible to any running proxies.
Now, when you run a proxy in standalone mode (without a JSON configuration file) it will connect to the mamori server to load the privacy rules.
Installing systemd services
Before you can deploy a proxy as a systemd service you must determine the following:
- The logical name of the system being proxied and the number of proxy instances being run.
- The local port(s) the proxy will listen on for incoming client http/s requests
- The remote host(s) the proxy is forwarding requests too.
- The remote port(s) the proxy is forwarding requests too.
- Whether you are running as a standalone service or with a mamori server.
- Optional (for application/API proxies only) - the request header that contains the user identity/user. Only applicable if running with a mamori server.
If running the Qlik proxy check whether the proxy requires SSL for client or Qlik server connections.
Considerations for running multiple service instances**
In some cases you may want to run more than one proxy service instance in order to scale or integrate within a clustered architecture.
N proxies, N applications
Different application have different endpoints and response structures. To run multiple application/API Proxy services for different applications:
- each application must be configured using a dedicated system specific proxy properties file. The naming convention is ```config/proxy-{system}.properties`.
- each Application Proxy service instance must listen on a unique local port on the proxy given machine
N proxies, 1 application
If you are running multiple proxy instances/services, for a single application then:
-
each instance uses the same (common) system properties file. The naming convention is
config/proxy-{system}.properties. -
each Application Proxy service instance must listen on unique local port on the proxy machine.
Once you've established your systems, hosts, ports and instances and have organised and configured the proxy properties files appropriately, you can install the proxy as systemd service(s).
Application/API proxy
This will install the proxy as a systemd service which can be started/stopped using systemd commands.
In standalone mode, a proxy is configured using a local JSON configuration that contains the masking rules for the API endpoints.
To install in standalone mode:
/opt/mamori/server/http-proxy-{version}/install_service.sh {system} <instance e.g 1,2,3..N> <local port> <remote host> <remote port> <json configuration file>
This will install proxy <instance> for {system}. The systemd service name is mamori-http-proxy-{system}-<instance>.
To install to work with a mamori server:
In this mode the masking configuration is managed inside the mamori server. The proxy will evaluate the masking rules and reveals based on the incoming HTTP request user and the user's mamori roles.
To install the proxy as a service working with a mamori server:
/opt/mamori/server/http-proxy-{version}/install/install_service.sh {system} <instance e.g 1,2,3..N> <local port> <remote host> <remote port>
This will install proxy <instance> for {system}. The service name is mamori-http-proxy-{system}-<instance>.
Qlik proxy
This will install the mamori QLIK proxy as a systemd service which can be started/stopped using systemd commands. Masking configuration is managed inside the mamori server. The QLIK proxy will evaluate the masking rules and reveals based on the incoming HTTP request user and the user's mamori roles.
Before installing the QLIK proxy check that the external facing IP is configured to route to the proxy hostname in the proxy-{system}.properties config file.
e.g
# set external facing ip for the proxy...note this could be your Load Balancer or the proxy machine
# change this!
# dont use localhost
redirect.to=<proxy host name>[:<local port>] <-- e.g qlik..com (include the port if the proxy is exposed directly on a custom port not behind an LB or webserver)
To install the Qlik proxy as a service working with a mamori server:
/opt/mamori/server/http-proxy-{version}/install/install_qlik_service.sh {system} <instance e.g 1,2,3..N> <local port> <remote host> <remote port> <clientssl> <serverssl>
This will install proxy <instance> for {system}. The service name is mamori-qlik-proxy-{system}-<instance>.
The recommended proxy local port is 8080 as port 443 is a privileged port. It is highly recommended that if using SSL that you configure your web server (NGINX or APACHE or HAPROXY) to handle the SSL terminator and forward to the proxy running on your local port e.g 8080.
If a web server (NGINX or APACHE) is handling the SSL terminator pass in the <clientssl> as false to the service installation script.
Service example with jsonplaceholder
Overview
jsonplaceholder.typicode.com is a publicly available REST API that exposes several endpoints.
In this example you will be installing the proxy as a service and running the proxy against the jsonplaceholder API.
Step 1 - Run a traffic capture to generate a sample JSON configuration file
Follow the instructions in the traffic capture example.
Step 2 - Upload the JSON configuration to your mamori server
To import your rule configuration into the mamori server use the import function. In mamori navigate to Policies->Application Policies.
- Select mamori json as the file format
- Specify jsonplaceholder as the system
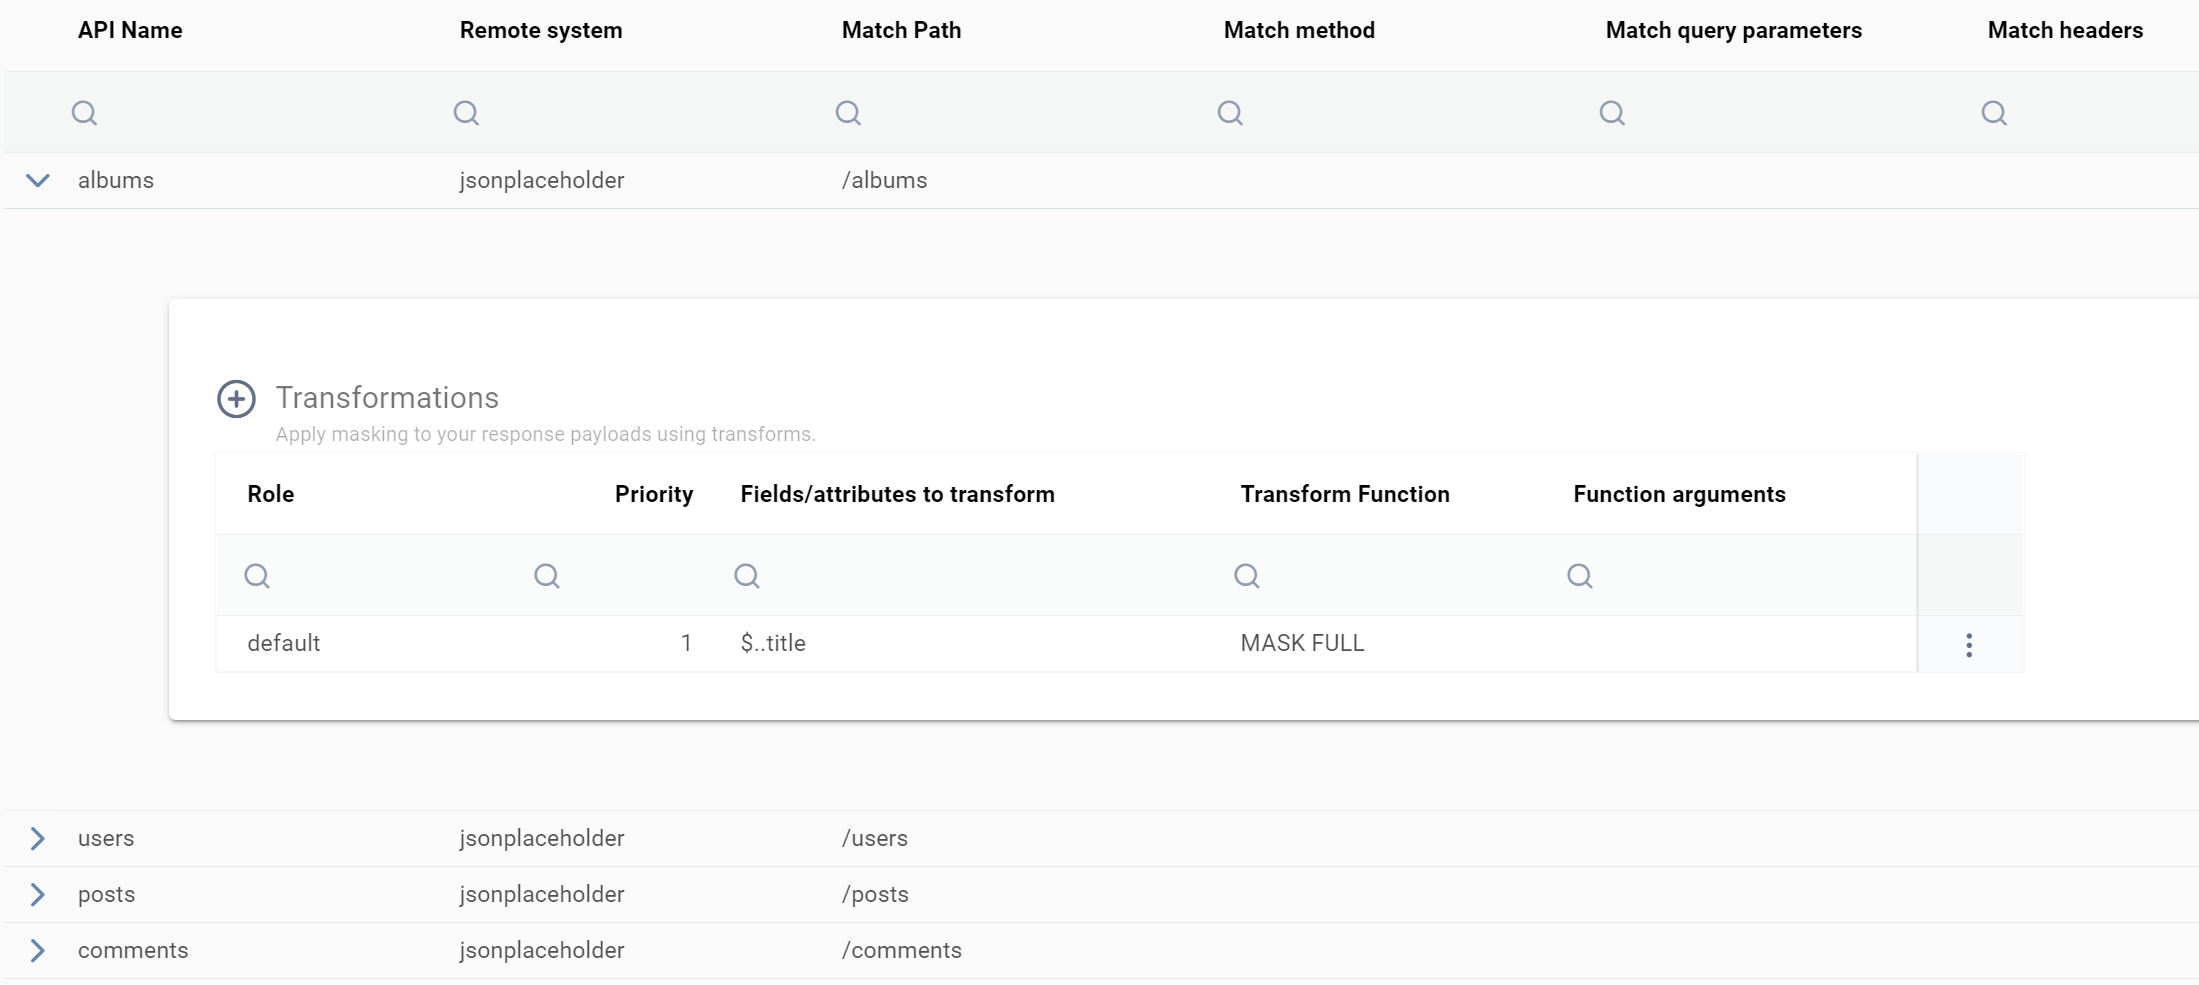
If you have uploaded your file successfully you should see the jsonplaceholder rules in the grid:
Step 3 - Activate the rules for system jsonplaceholder
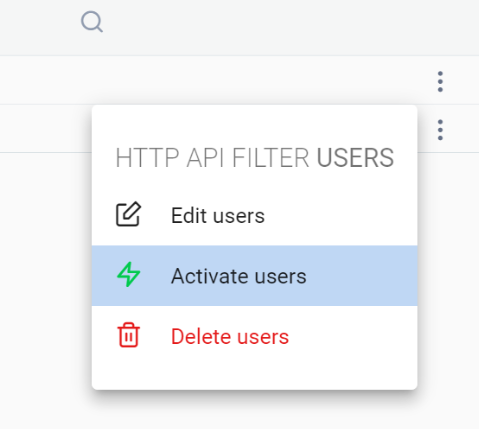
In the UI, activate each jsonplaceholder filter/endpoint. For example activate the filter for users/:
Step 4 - Install the proxy as a service for jsonplaceholder
Run the utility to configure and encrypt the mamori server credentials in the properties file.
You may need to create a proxy user in mamori and grant it admin, if you haven't already:
/opt/mamori/server/http-proxy-{version}/installation/configure_connection.sh jsonplaceholder <mamori server host> <mamori server user> <mamori server password>
Install the jsonplaceholder proxy service on port 9443:
/opt/mamori/server/http-proxy-{version}/install_service.sh jsonplaceholder 1 9443 jsonplaceholder.typicode.com 443
This will install proxy instance 1 for system jsonplaceholder. The service name is mamori-http-proxy-jsonplaceholder-1.
The installed proxy service will source the rules for masking jsonplaceholder from the mamori server.
Check the system status:
sudo systemctl status mamori-http-proxy-jsonplaceholder-1
Start the service:
sudo systemctl restart mamori-http-proxy-jsonplaceholder-1
Step 5 - Access the jsonplaceholder REST API via the proxy service using CURL
Simulate an HTTP client by issuing the following CURL commands to the proxy running locally on port 9443:
curl --insecure https://localhost:9443/posts
curl --insecure https://localhost:9443/comments
curl --insecure https://localhost:9443/albums
curl --insecure https://localhost:9443/users
Note, the curl --insecure flag is required to tell curl to accept the proxy's self signed certificate.
Next steps
You can now continue to maintain the jsonplaceholder masking rules inside the mamori server.