Web Console
Overview
Use this access method if you want to
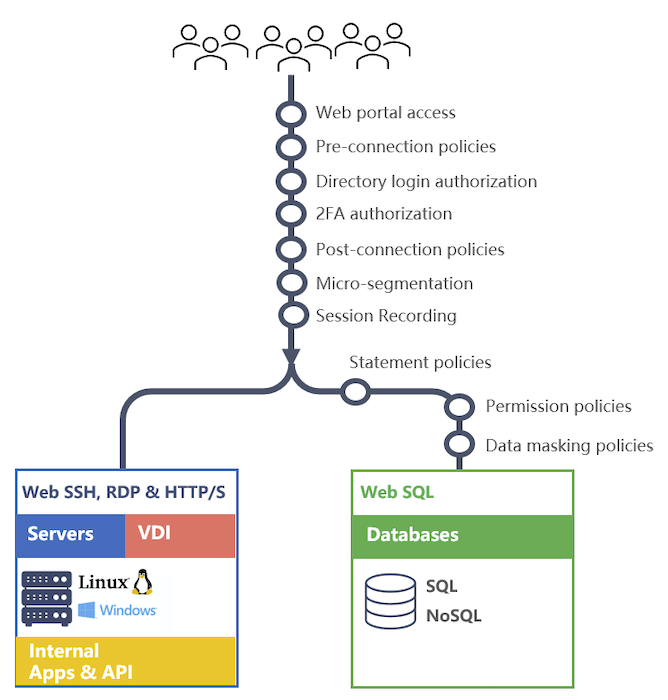
The Mamori web console is what administrators use to manage the Mamori server configuration and also what end users use to access their resources.
From the web console a non-admin user can
- See active permissions
- Request and endorse on-demand resources and policies
- Connect to RDP, SSH, and HTTP/S resources
- Access the secret vault
- Run database commands in the Web SQL editor
Additionally administrators can
- Configure the Mamori server
- View logs
- View monitoring dashboards
For remote access to the Mamori web console
- Open tcp port 443 on your Mamori server's firewall
- Forward tcp port 443 from your public firewall to the Mamori server
Web Console Access Security Layers
Enabling Modules
The web console menus will change based on the enabled modules.
To enable/disable modules do the following
Click Server Settings > GeneralScroll to the module section and enable the desired module(s) relevant to the web console access
- Database Access Controls (DBPAM)
- Data Privacy Controls
- SSH Access Management
- Remote Desktop Access Management
- Application Access Management
- Secret Management
Configuration Steps
Prerequisites - Completed Common Configuration
- Configured identities & roles
- Configured 2FA provider
- Verified the mamori server can access the target resources
If on-demand resources are going to be used
Step 1 - Configure Mamori data sources & datasource credentials
Step 2 - Configure Data Access Polices
Step 3 - Configure SSH, RDP, HTTP/S and secrets
Step 4 - Lockdown service accounts that will not be multi-factored
Manage Datasources
Add Datasources
Prerequisites
Click Datasources
Click
Next, edit the datasource details
Field Description Datasource Name The reference for this datasource Database name in SQL tools.
Datasource Type The datasource type Datasource Group Set if you are going to push down db credentials via Mamori
For example, create SOMEUSER with these grants on all databases in this group.Driver defaulted to driver for datasource type Connection Details Enter database connection information Credential Reset Days Converts the credential to a managed credential that is reset every X days
The periodinally generated password uses mix case text, numbers, punctuation and has a max lenght of what is allowable by the database. An example password is '8jh{IW}Dp#6cPPq2#6A}aoS.R(7t4}P
Important! This credential can't be retreived once it is Mamori managed.Credential Role (Optional) The role that is linked to this managed crendential Click Save
If this is required for a critial application, then have one HA Mamori server for the application traffic and another for the ad hoc traffic
Special Datasource Instructions
Oracle Datasources
Drivers supported for datasource creation
Driver Oracle Versions JDBC Spec JDK ojdbc6.jar (11.2.0.4)
pre-installed7 to 21c 4.0 JDK8,11 & 17 ojdbc10.jar (19.18.0.0) 21c, 19c, 18c, & 12.2 4.3 JDK11-17 ojdbc8.jar (19.18.0.0) 21c, 19c, 18c, & 12.2 4.2 JDK8,11 & 17 Connection String for oracle RAC
If the target database is RAC or requires other special TNS options, then enter the TNS entry in the datasource advanced > connection string field
jdbc:oracle:thin:@(DESCRIPTION= ... (LOAD_BALANCE=yes)...)
Mongo Datasource - If creating a mongo datasource, the authSource db and tls settings can be passed in under the advanced settings using either the Connection Properties:
authSource=admin;tls=trueor the Connection URL Suffix:
&authSource=admin&tls=true
MySQL 8 Datasource - For MySQL driver version 8 and a DB server without SSL, add the following to the datasource connection string properties.
useSSL=falseAzure Synapse - Dedicated Pool & Serverless
Microsoft Azure Synapse warehouse does not support the sys.sysdepends system view. To disable the lookup set the following property.

supportsObjectDependencies=false
Manage DB Credentials
Any number of credentials can be added to a datasource and then mapped to users and roles. End user connections will use the mapped credentials.
End users will use their identity logins to access databases, which means they will never have or require access to the actual database credentials.
Add Credential
Prerequisites
Added a datasource
Click Datasources
Select the target datasource and click
Click Manage Credentials
Click Add Credential
Next, set the credential details
Field Description Username The database login Password The database login password Credential Reset Days Converts the credential to a managed credential that is reset every X days
The periodinally generated password uses mix case text, numbers, punctuation and has a max lenght of what is allowable by the database. An example password is '8jh{IW}Dp#6cPPq2#6A}aoS.R(7t4}P
Important! This credential can't be retreived once it is Mamori managed.Click Validate
Click Save
Manage Data Access Policies
To configure database access via the web console or proxies a user needs
- Permission on a datasource credential
- A session passthrough mode permission
Passthrough Mode Description PASSTHROUGH Applies connection policies, but does not apply statement, session or data policies. MASKED PASSTHROUGH Applies connection, session & statement policies. Allows statements that can't be analyzed. PROTECTED PASSTHROUGH Same as MASKED PASSTHROUGH, but blocks all unregistered statements that can't be analyzed.
- At least SELECT permission on a object
- For native DB Tool access grant the DB Object permissions the tools require
- CALL, EXECUTE SQL BLOCK, EXECUTE DYNAMIC SQL
- SELECT on respective catalogs. eg., SYS & SYSTEM for Oracle
- For WebSQL Access grant the Mamori permissions
- WEB SQL EDITOR - Enables WebSQL Editor access
- WEB EXPORT DATA - Enables data extract from the WebSQL Editor
- WEB AUTO COMMIT - Enables the WebSQL auto-commit toggle button. By default WebSQL sessions are auto-commit = false.
Mamori allows for micro-segment a database credential's existing permissions. It can't add additional.
Provision Access
Follow the steps bellow to manually grant permanent or temporary database access to a user or role.
Prerequisites
Add the credentials to the default_database_credentials role
- Click Roles
- Double click on the default_database_credentials role to edit it
- Click Database & Data Access > Credentials
- Click Add Credential and select the data source
- Select an existing credential or add enter details for a new one
- Click Add
Assign default_database_credentials to a user
- Click Roles
- Find default_database_credentials in the grid and click
- Click Manager Assigned Users
- For time grants toggled advanced options
- Click on the user to add or remove the grant
Assign default_database_access_ro to a user
- Click Roles
- Find default_database_access_ro in the grid and click
- Click Manager Assigned Users
- For time grants toggled advanced options
- Click on the user to add or remove the grant
The user will now be able to access the granted databases via WebSQL and database proxies
Manage On-Demand Access
Manage who has access to request a credential@datasource combination
Prerequisites
Added a datasource & Credential
Click Datasources
Select the target datasource and click
Click Manage Request Grants
Click Add Request Grant
Next, set the form details
Field Description Grantee Type User or Role Grantee A role, an Mamori user or an external directory user Mamori Resource Policy Select a DB resource policy. The grant will fail otherwise. Credential The credential that will be granted via this request Description The description that the user will see when making a request Click Save
The user will see the datasource in the request resources grid
Manage Remote Desktops
To provision access to RDP or VDI on a windows server configure a remote deskop login and grant it to a user or role.
Remote desktop sessions have 3 possible authenticaltion modes
| Authentication Mode | Authentication Flow | Login Recorded |
|---|---|---|
| OS Authenticated | User is multi-factored User is challenged with the standard Windows login. | Yes |
| Mamori Prompt | User is challenged with a web RDP login prompt User is multi-factored. | No |
| No Prompt | User is multi-factored User is automatically logged in with a pre-configured credential. | No |
Connecting via a native RDP client using the ZTNA solution will 2FA and record the TCP access, but it will not record the RDP session.
Create
Click Remote Desktops
Click
Click the GENERAL tab
Set the properties
Field Description Connection Name Your reference for the remote desktop session Hostname Target server Port Target server port.
Defaults to 3389Remote Username OS login name Remote Password OS login password Remote Domain OS login domain Security Server session authentication mode.
Defaults to AnyIgnore TSL certificate validation errors Defaults to true Connect to system console Defaults to false Click the FILE SHARING tab
Set the properties
Field Description Enable file sharing CTRL-SHIFT-ALT will diplay the file sharing menu
Defaults to falseDisable download Disable download buton
Defaults falseDisable upload Disable upload buton
Defaults falseDrive name Name of the mappped temporary drive
Defaults SharedClick the ADVANCED tab
Set the properties
Field Description Fill browser window Scales the RDP session to the browser windows Width Defaults to 1024 Height Defaults to 768 DPI Defaults to 96 Clipboard Mode mode for copy/paste from clipboard Disable Clipboard Copy Defaults false Disable Clipboard Paste Defaults false Server Keyboard Layout Session keyboard layout Server Keyboard Layout Session keyboard layout Remote Application Settings Selection option for VDI application
RDP Application Service Must be enabled on the serverVisuals Font Smoothing, Theming, Fill Window Drag & Lossles compression Click OK
Manual Grant
- Click Remote Desktops
- Find the desired desktop definition in the grid and click
- Click Manager Assigned Users or Manager Assigned Roles
- For time grants toggled advanced options
- Click on the grantee to add or remove the grant
Setup On-Demand
- Click Remote Desktops
- Find the desired desktop definition in the grid and click
- Click Manage Request Grants
- Click Add Grant
- Enter the grant information
- Click Save
Connecting
To connect to a remote desktop
- Login to the Mamori portal
- Click Remote Desktops
- Find the remote desktop you want to access
- Click the Connect button on the target desktop
Manage SSH
To provision access to a linux server configure an SSH login and grant it to a user or role.
SSH sessions have 3 possible authenticaltion modes
| Authentication Mode | Access Method | Authentication Flow |
|---|---|---|
| Public Key | SSH Proxy Web Console | SSH Session is launched with pre-configured key. User is multi-factored |
| Enter Credentials | Web Console | SSH Session is launched with pre-configured credentials. User is multi-factored. |
| Login Prompt | Web Consolse | User is multi-factored Linux login prompt presented. |
Connecting via a native SSH clients using the ZTNA solution will 2FA and record the TCP access, but it will not record the SSH session.
Create
Click SSH Logins
Click
Set the properties
Field Description Connection Name Your reference for the resource Hostname Target server name or IP address Port Target server port.
Defaults to 22Authentication Mode How to authenticate the user Theme The terminal's color theme Click Save
Manual Grant
- Click SSH Logins
- Find the SSH Login in the grid and click
- Click Manager Assigned Users or Manager Assigned Roles
- For time grants toggled advanced options
- Click on the grantee to add or remove the grant
Setup On-Demand
- Click SSH Logins
- Find the SSH Login in the grid and click
- Click Manage Request Grants
- Click Add Grant
- Enter the grant information
- Click Save
Connecting
To connect to a linux server
- Login to the Mamori portal
- Click SSH Logins
- Find the SSH Login you want to access
- Click the Connect button
Manage HTTP/S
To provision access to a web service configure a web resource and grant it to a user or role.
Web resources currently do not have authentication modes, but that is coming soon.
Launching web sessions that are excluded from the PAC script are not recorded.
Create
Click HTTP Resources
Click
Set the properties
Field Description Resource Name Your reference for the resource URL Target URL Exclude from PAC If excluded the URL, then mamori will launch the site but traffic will not go through the proxy. Description Your description for the resource Click Save
Web Resource Properties
Web resources can have additional properties to allow you to control how the resource is handled.
Resource Properties properties
Field Description Default datasource The datasource that is presented to event handler none launch The url that will be launch. Remote URL certificate_name Certificate that is used when this url is proxied Mamori generated certificate ca_certificate_name CA of certificate that is used when this url is proxied. Typically required when certificate is not already trusted by clients. Mamori generated certificate key_name The private key to use when this url is proxied Mamori generated key pac_override The name to put into the PAC script Remote URL proxy_method The method to use in PAC script https domain_override Regex used in transparent parent proxy to determine if extra headers are required
Manual Grant
- Click HTTP Resources
- Find the resource in the grid and click
- Click Manager Assigned Users or Manager Assigned Roles
- For time grants toggled advanced options
- Click on the grantee to add or remove the grant
Setup On-Demand
- Click HTTP Resources
- Find the resource in the grid and click
- Click Manage Request Grants
- Click Add Grant
- Enter the grant information
- Click Save
Connecting
To connect to a web resource
- Login to the Mamori portal
- Click HTTP Resources
- Find the resource you want to access
- Click the Connect button
Users can also just enter the URL in the browser.
Manage Secrets
Mamori allows you to store binary(file) or text secrets. Access to a secret can then be provided via a direct grant, a role or as an on-demand resource.
To provision access to a secret configure a secret resource and grant it to a user or role.
Create
Click Secrets
Click
Set the properties
Field Description Name Your reference for the resource Type Secret, Multi-Secret or File Common fields
Field Description Username Host Protocol Secret type Secret Secret value Expires At Datetime of when this secret expires YYYY-MM-DD HH24:MM:SS Expiry Alert At Datetime of alert prior to expiry Expiry Alert The Alert to trigger Description Your description for the resource Multi-Secret field
Field Description Secrets Select the secrets the multi-secret combines File field
Field Description Secret Select the file (ascii or binary) that contains the secret Click Save
Manual Grant
- Click Secrets
- Find the resource in the grid and click
- Click Manager Assigned Users or Manager Assigned Roles
- For time grants toggled advanced options
- Click on the grantee to add or remove the grant
Setup On-Demand
- Click Secrets
- Find the resource in the grid and click
- Click Manage Request Grants
- Click Add Grant
- Enter the grant information
- Click Save
Connecting
To access a secret
- Login to the Mamori portal
- Click Secrets
- Find the resource you want to access
- Click the Connect button
Users can also just enter the URL in the browser.