WireGuard
Enable this module if you want to
What is an IP resource?
An IP resource is any subnet or ip + port(s) combination. For example,
10.0.1.0/24 & ports 22,80,443,5600-5609
10.0.2.124/32 & ports 80,443
Security Layers
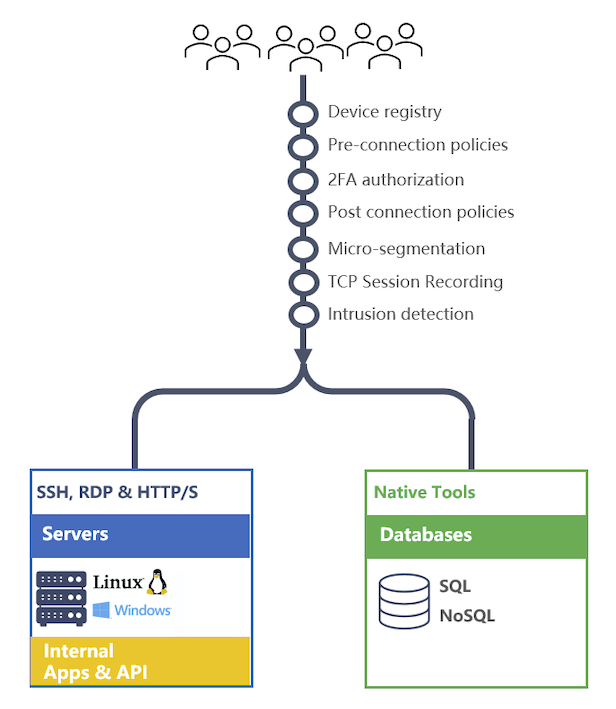
Overview
IP Access controls are provided via wireguard vpn. Wireguard is a fast VPN that uses state-of-the-art cryptography. It is faster and simpler than IPsec and considerably more performant than OpenVPN.
Mamori simplifies the wireguard configuration and integrates it with identity management, 2FA, Access On-Demand and monitoring services.
What is best practice?
Best practice is for user devices NOT be provided with direct access to ssh ports, rdp ports, web service ports and databases ports. All those connections are to go through their respective proxies. This provides improved management, security, monitoring and activity recording.
Is this only for remote access?
No, IP access controls can be configured for devices inside a firewall to internally provide modern ZTNA features such as micro-segmentation, multi-factor authentication and intrusion detection.
Does this work with air gap environments?
Yes
What triggers user's multi-factor authentication?
A user's multi-factor authentication is triggered when they access an IP - not when they activate the network. The authentication remains active until a user is inactive for a specified amount of time.
Enabling Modules
To enbable the ZTNA module do the following
Click Server Settings > General
- Enable - Edge Networking (WireGuard)
Configuration Steps
To configure direct IP access via Mamori follow the steps below
Prerequisites
Step 1 - Configure Wireguard
Step 2 - Define IP resources
Step 3 - Grant IP resources to users and/or roles
Step 4 - Add user devices
Configure Wireguard
The wireguard configuration is broken up into three parts:
- Virtual peer network
- Subnets to publish
- Email template users recieve for a new peer
To view and manage the wireguard configuation
Click Wireguard
Click Settings
Click NETWORK in the dialog
Next, enter the details
Field Description Public Address defaults to your mamori server ip Port defaults to 51871 Private IP Address Desired Server IP in new subnet Private IP Subnet Mask defaults to 255.255.255.0 Your DNS Server IP (optional) Set if you want to access resources by name Maximum Transmission Unit (MTU) Default 1420. If connectivity issues exist, then set to lower value. Intrusion Alert Channels Select intrusion
The alert channel to notify when a device is locked.Intrusion Scan Threshhold Default 25. Number of unique IPs and ports a device can scan before being blocked. Auto-enrollment Role(s) Select default_wireguard_user to ensure all users will have peers automatically added when they login for the first time. Max number Of User Added Peer(s) Max number of devices a user can self-register. Click SUBNETS in the dialog
Next, enter the details
Field Description Exposed Subnets comma separated list of local subnets to publish.
eg, 192.168.1.0/24, 10.50.0.0/16Network Interface comma separated list of interfaces for each subnet.
eg, 192.168.1.0/24, 10.50.0.0/16Click Generate to generate the network UP script
Click EMAIL in the dialog
Review & edit the new user peer email template
Click Save
Allowing IP Scans
To run network scan commands a user must have access to the IP SCAN permission.
Click for recommened roles for ZTNA module
Enabling ping
To allow ping set the IP resource port to 0 or *
2FA triggering rules
There are 2 controls on the 2FA of IP resource access
On Grant of IP Resource
When a resource is granted toggle Multi-factor in the advanced options. Default is On.
Use this option for resources like DNS servers or other devices that you don't want to 2FA. If you do 2FA your DNS server access, then a user will get multi-factored when they activate the WireGuard network.IP Resource Port Setting
IP Resource Port 2FA flow * 2FA will trigger for every unique IP:Port combination Specific ports
eg. 22,443,1000-30002FA will trigger once for the IP
To ensure a user gets a single 2FA notification when accessing a network drive make an IP resource with the ports : 80,137,138,139,445,443
Do not use * as this will cause them to get many 2FA requests.
Manage IP resources
For detailed information on creating and managing IP Resources, see IP Resources.
IP Resources define IP address and port combinations that can be accessed via WireGuard. To create and manage IP resources:
Click Wireguard
Click IP Resources
User Device(s)
Add A Device(s)
To add a device for a user ...
Click Wireguard
Click Peers
Click Add
Next, enter the details
Field Description Mamori User The identity this device will be linked to Device Name Reference name for device Advanced Option: Peer Public Key Device's public key Advanced Option: Peer Private IP Address Device's IP in wireguard network Click Add Peer
After adding the peer Mamori will display the device configuration.
Click on Email Configuration to email the configuration and client setup instructions to the user.
Instruction for Non-Admin User accounts
For users that do not have admin permissions on their devices
As administrator of the device
1 - Install wireguard client on the device
2 - Configure the wireguard client for the user
3 - Run the powershell script below replacing NON_ADMIN_USER with the user's name on the device
New-Item -Path HKLM:\Software\Wireguard
Set-ItemProperty -Path "HKLM:\Software\Wireguard" -Name "LimitedOperatorUI" -Value 1 -PropertyType "DWord" -Force
Add-LocalGroupMember -Group "Network Configuration Operators" -Member "NON_ADMIN_USER"